Lab 5: Week 3 - Prep: Establishing Google Cloud Access
Background
During week 3 of the lab, we will start writing data to the cloud. But first, we have to do some preparations in order to be able to access the Google Cloud. Completing these steps, will result in having a credentials.JSON file, that we can use to access the google sheets API.
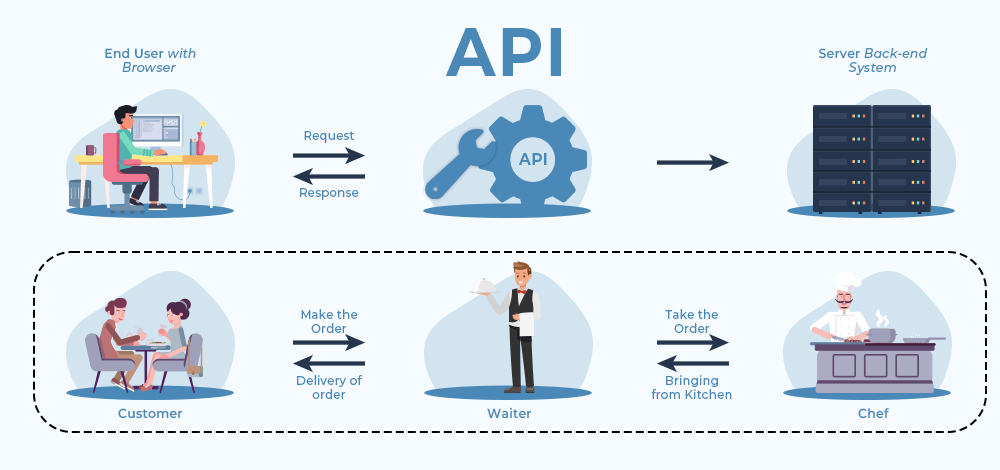
The term API stands for Application Programming Interface.
An application programming interface (API) is a way for two or more computer programs or components to communicate with each other. It is a type of software interface, offering a service to other pieces of software.
Source: Wikipedia
You can imagine this like the image below.
Methods: Establishing Cloud-based Data Storage
For simplicity, we will be writing the data to cloud using a simple google sheet.
To do so, we need to enable the google sheets API for us to use on the google server side and set up a way to authenticate the RPi to google.
The next steps will do just that.
Step 1: Setting up a New Google Account
For security reasons, each team will need to establish a NEW google account for this portion of the lab. We will be using the google sheets API to write to google sheets. Setting up API access will grant access to read, write, and delete files stored in the cloud. Therefore, you need to create a new unique account.
Google accounts are free, so there is no cost to the student, and they are secure (i.e. – they have cyber protection systems in place that limit who can access your Google Cloud account). We will be learning how to navigate the cyber security systems so that we can authorize the Rasberry Pi to be able to read and write data to your new Google Cloud account.
- Navigate to google.com and create a new account. To do so, click on the account symbol in the top right corner and chose
Add Another Account - Chose the
Create Account Optionand follow the instructions to create an account using the following naming scheme:ISAT300SP26S2<Identifier>@gmail.com. (Replace the<Identifier>with the initials of the team members)
Step 2: Establishing Cloud-based Data Storage - Setting up Google Sheets API
Google, like all tech companies, has a tendency to change things around.
I updated this version of the instructions with new screenshots, if only there were substantial changes to the previous year.
This means some older screenshots will look a bit different compared to what you see, but will show the same functionalities.
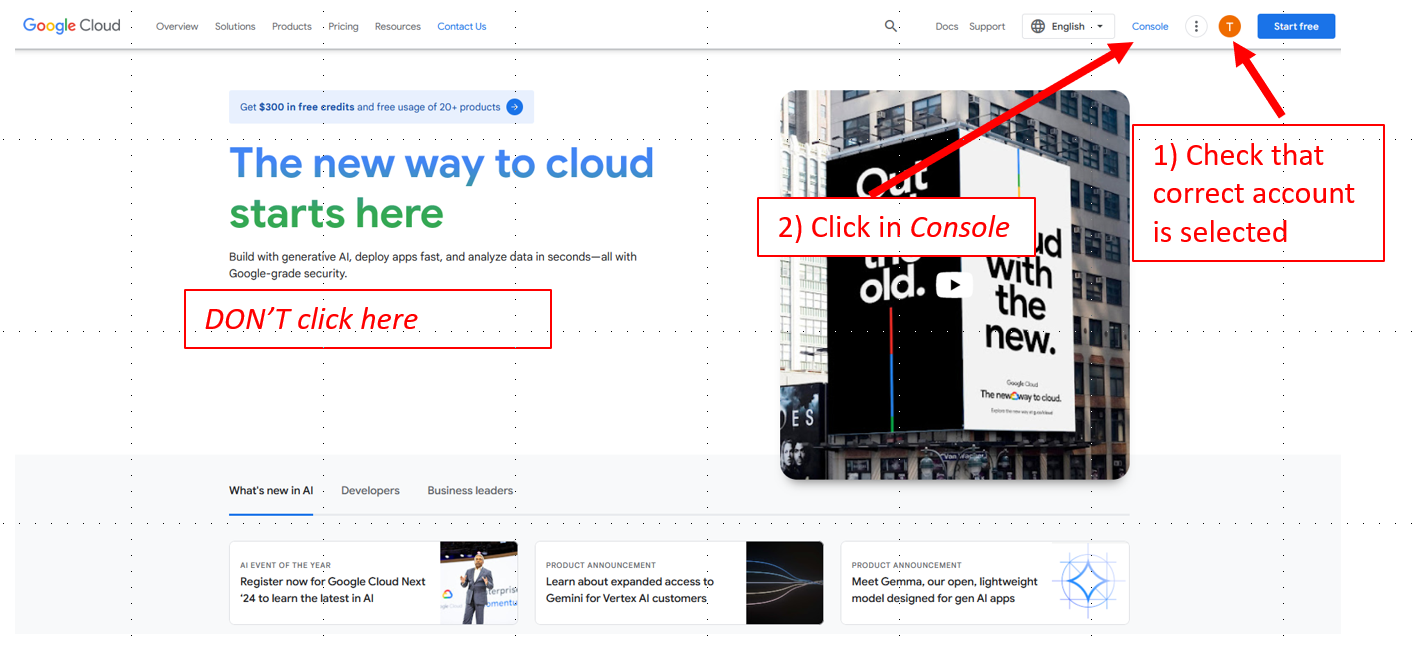
- Open a new tab and navigate to Google’s Cloud Computing Services
- Check in the top right corner (1) that your new google account is active.
- Ignore the
Get started for freeand click onConsole\(\rightarrow\) Agree to the Terms of Service- If you start the
Free-Trial, google will ask for credit card information. You can bypass that by going directly to theConsole
Getting to the Google Cloud Console - If you start the
- Create a new Project by clicking on
Select a Projectand then choseNew Projectin the top right corner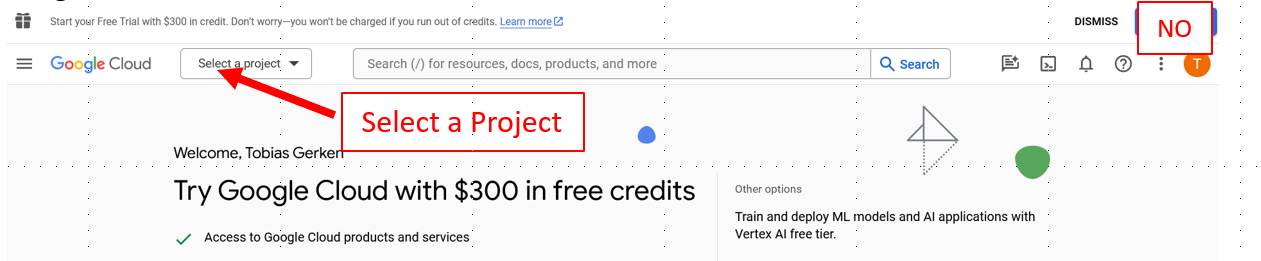
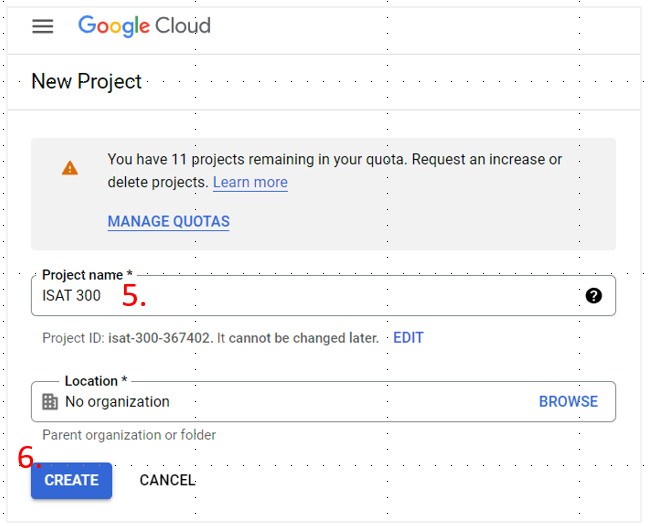
Give your project a name like ISAT 300 (see Figure)
Click
Create
After creating the project, you will automatically return to the
Console.Select the ISAT 300 Project from the
Select ProjectMenu.Open the left sidebar and select
APIs & Services(as shown below) and click onEnabled APIs & Services
Enable APIs & Services Now that your project is created, we need to enable the APIS. Click on Enable APIS and Services.

Enable APIs & Services - Continued You will see a Welcome message to the API Libraries. There are many APIs available. Use the search bar to search for Google Sheets or scroll down until reach the
Google Workspacecategory. Select the Google Sheets API by clicking on it.
Select Google Sheets API After you have selected the Google Sheets API, you will need to enable it.
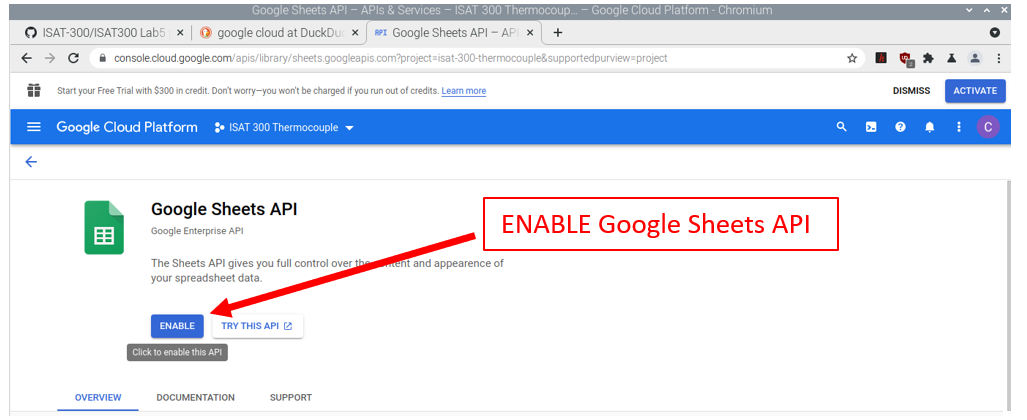
Enable Google Sheets API NoteA green check mark will appear if the API is enabled and the button will change from
EnabletoManage, but will have the same functionality as before.We now need to create a set of credentials that will allow us to use the API. Click on
Create Credentials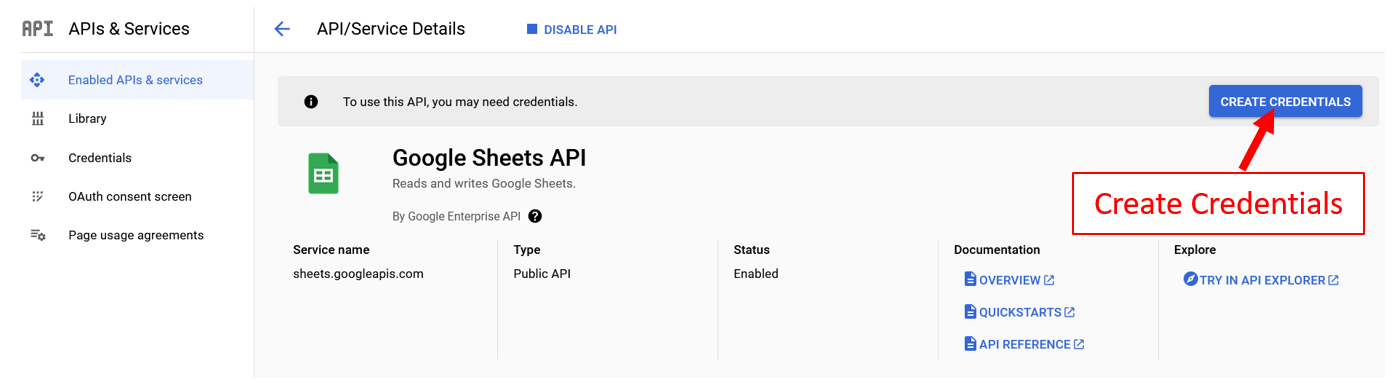
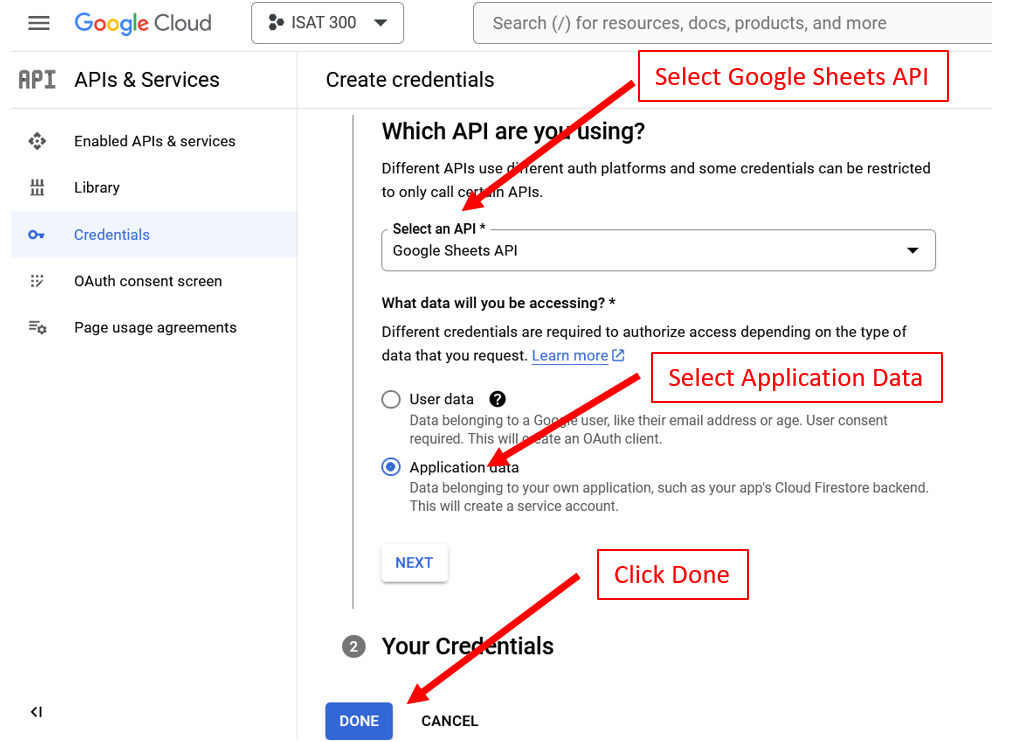
Create API Credentials
- From the Which API are you using? dropdown menu, select
Google Sheets API(see Figure). - For What data will you be accessing? select
Application Data. - Ignore the
Nextbutton and clickDone! If you accidentally clickNext, cancel out of the Service Accounts and restart at Step 13.
The next couple of steps configure, how a user can authenticate themselves with the Google Sheets App. We will be using Open Authorization or OAuth:
OAuth essentially allows access tokens to be issued to third-party clients by an authorization server, with the approval of the resource owner. The third party then uses the access token to access the protected resources hosted by the resource serve.
Google requires us to configure the OAuth consent screen first. This is the window, that will pop up for users to sign into the app. Click the
OAuth consent screenon the navigation tab on the left and start configuringOAuthby clicking on theGET STARTEDButton.In the App Information Step: Select an App Name like ISAT Thermocouple Lab. Select your Gmail account for the user support email and click
Next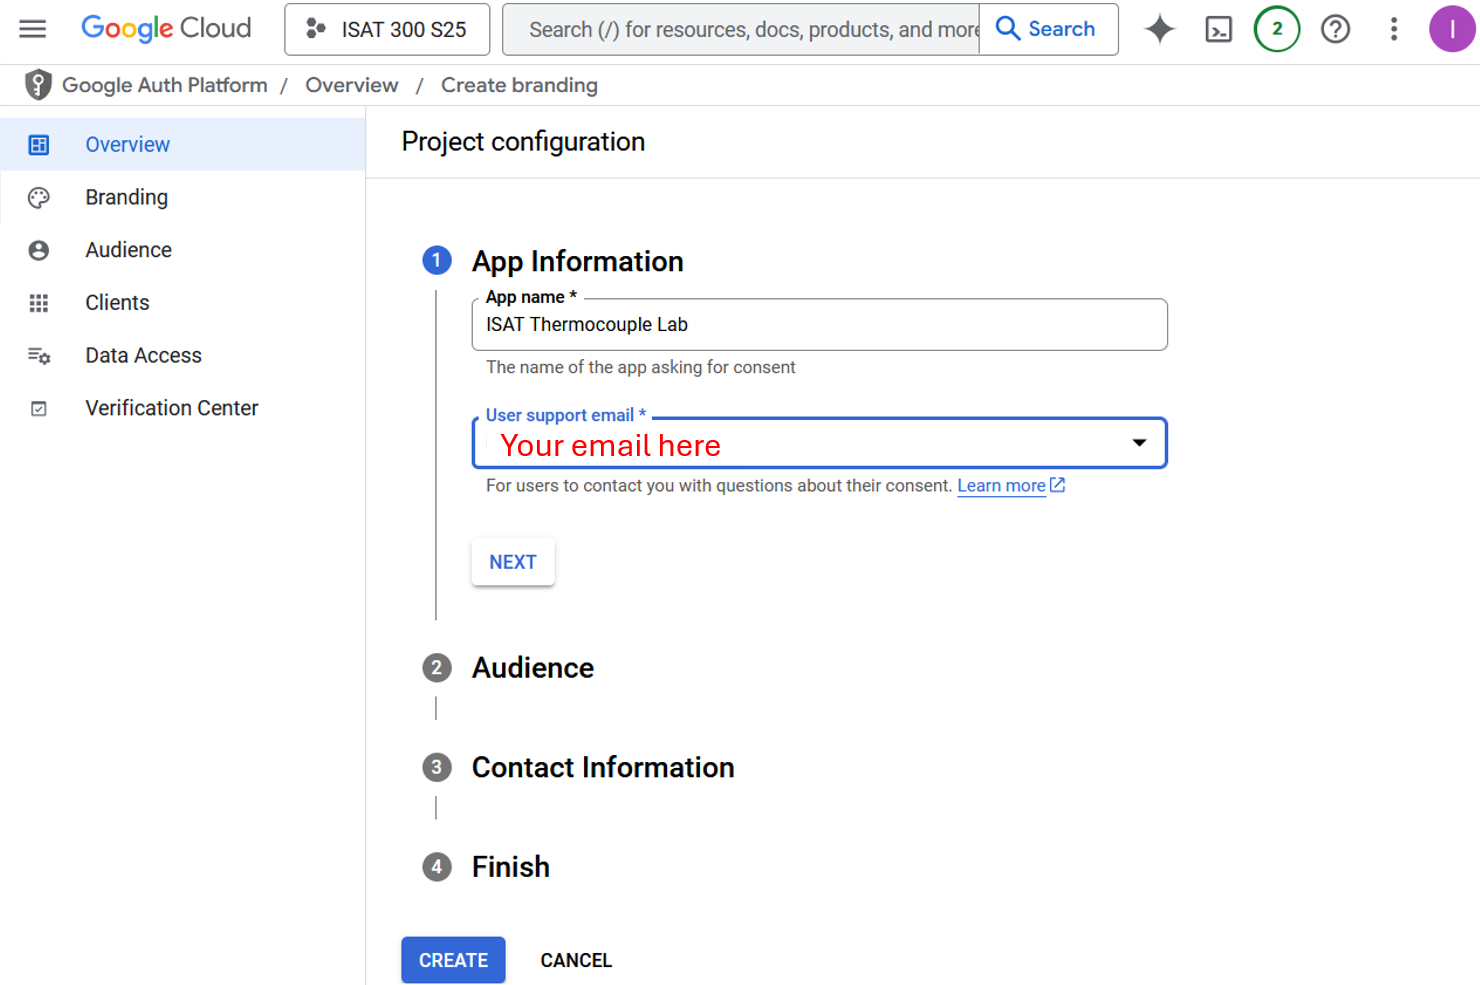
Configuring the OAuth consent screen - App Information In the Audience Step: Select
Externalas the User Type.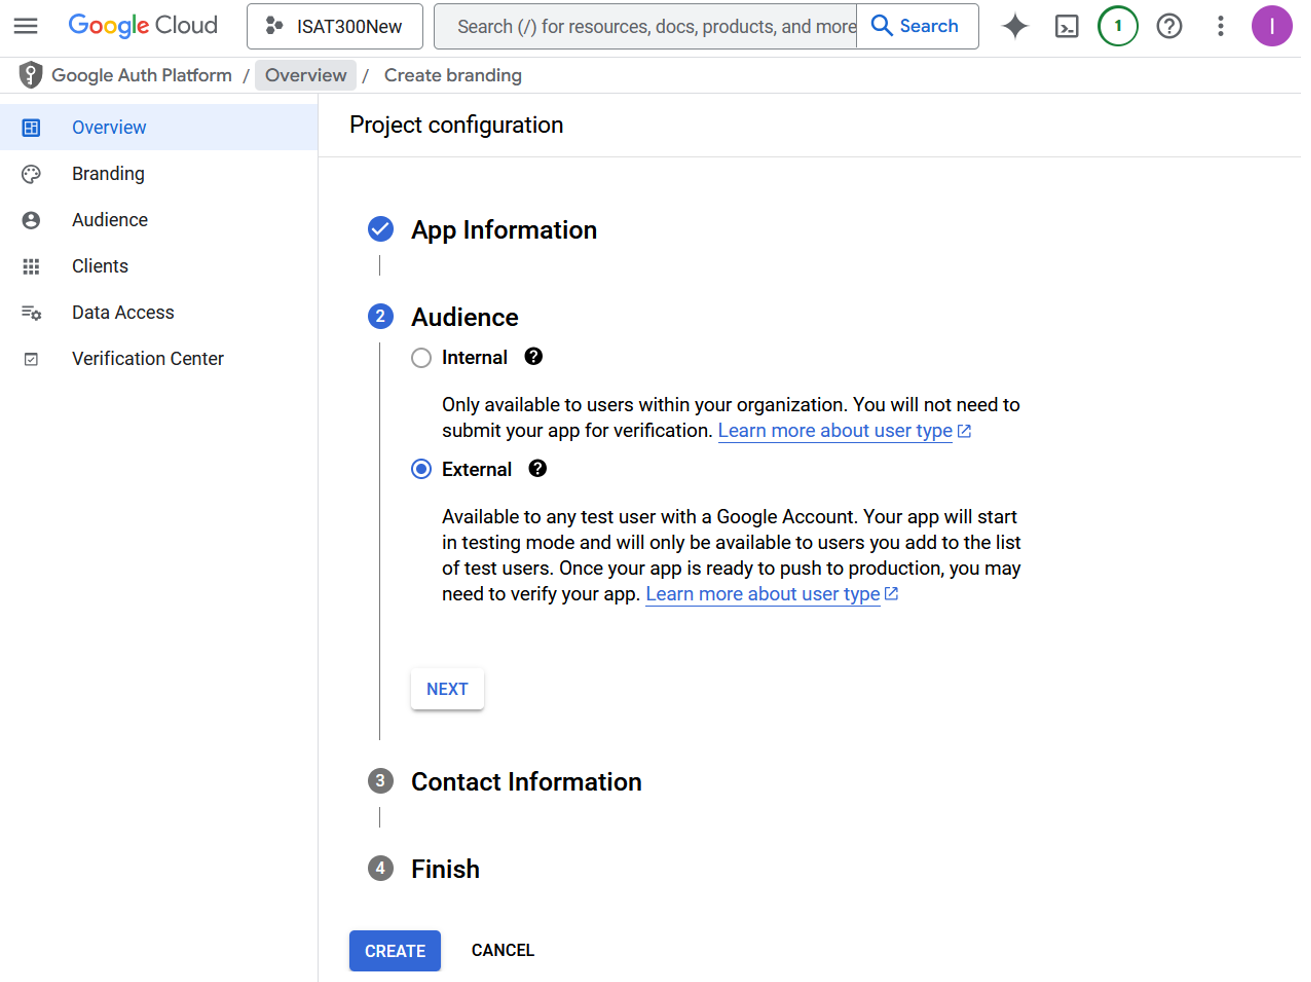
Configuring the OAuth consent screen - Audience In the Contact Information: Enter you Gmail again as the developer contact. Finalize the process by accepting the
Terms and Conditionsin the Finish Step. Then clickCreateto exit the screen.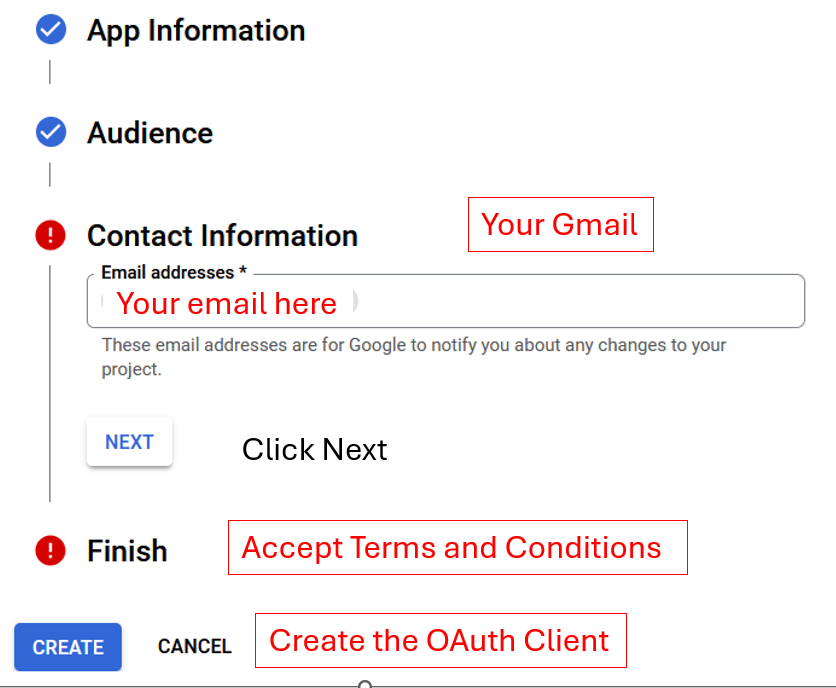
Configuring the OAuth consent screen - App Info Continues Next: Select the
AudienceScreen on the side bar to add yourself or your group members as a Test User to the App for the google sheets API.NoteYou can use your new google email account, or any other google account. However, because the App is not published for everyone to use (which is something that we won’t do, the google account you use in the following labs, will have to be added here.)
Make sure that the email you enter saves and appears in the Test users Section below the
ADD USERSButton. You need to hit theADDbutton to confirm.
Configuring the OAuth consent screen - Adding Test Users Navigate to
Data Accesson the side bar and click onAdd or Remove Scopes. SelectGoogle Sheets APIthat allows you toSee, edit, and delete all your Google Sheets spreadsheets(which is why you need to use a new account). Then clickUpdateto confirm and exit. If you cannot find the Google Sheets API, you can use theFilterto search for it.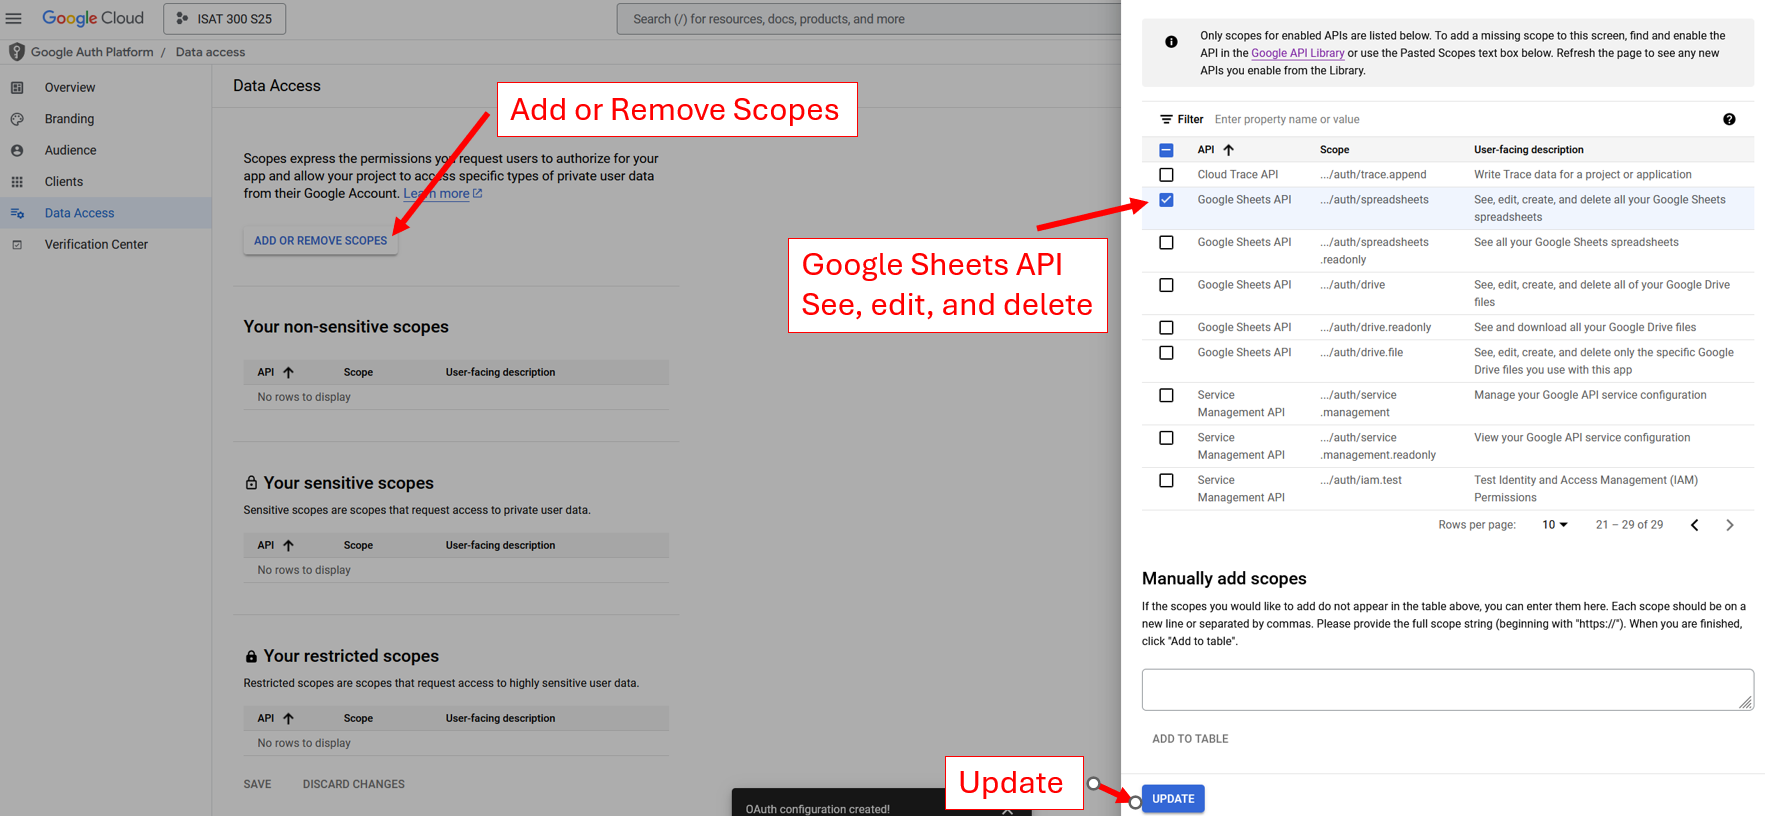
Configuring the OAuth consent screen - Scopes Navigate to
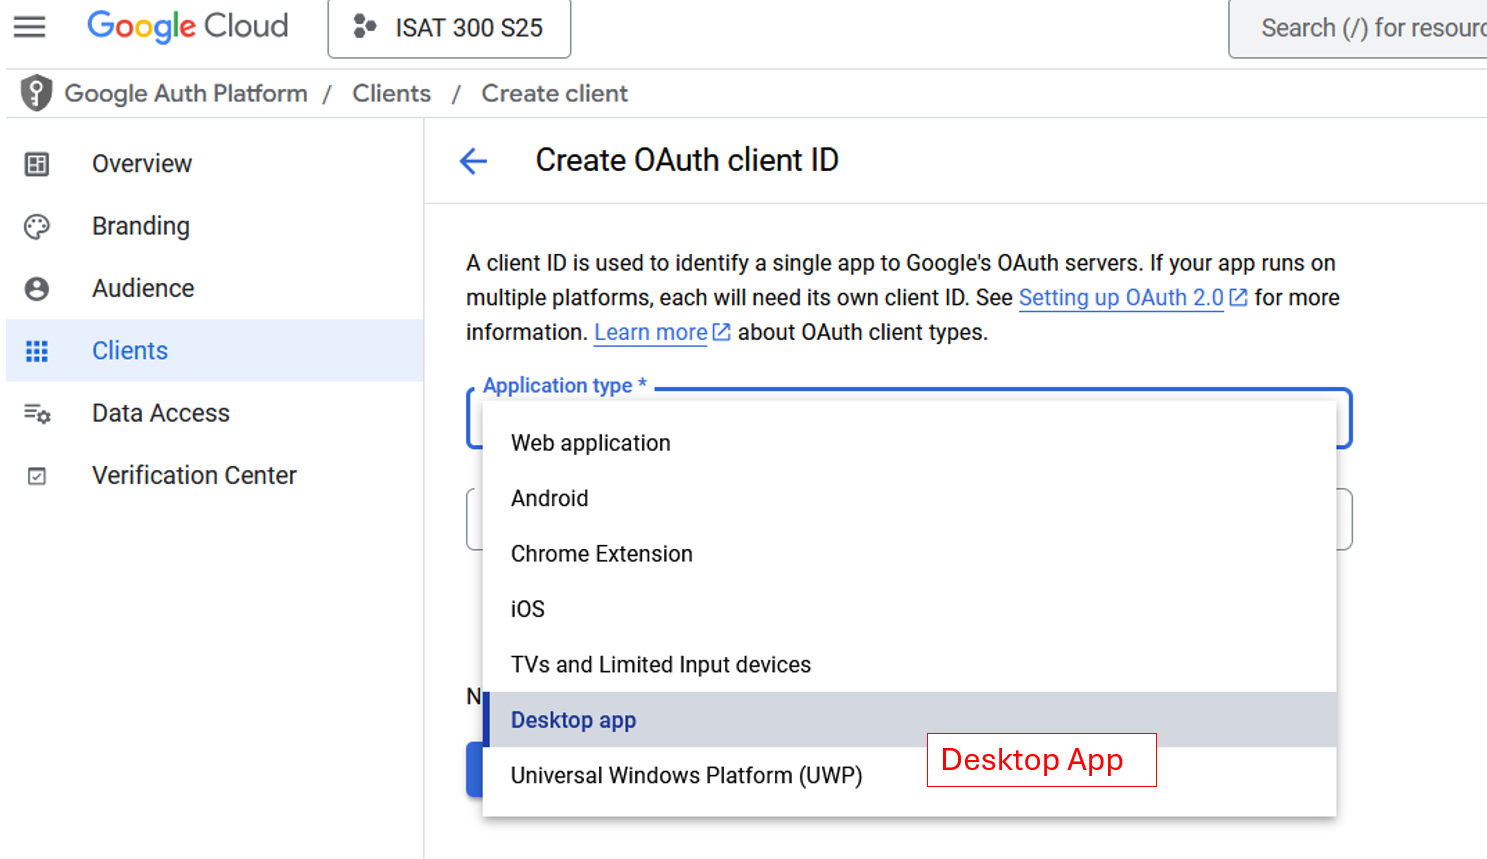
Clientson the side bar and select+ Create clientto finally create credentials for the API.
- For Application Type, select
Desktop. You don’t need to rename it. ClickCreate
Make sure that you complete the next two steps exactly as instructed and that you keep the downloaded JSON-file in a safe place. You will need it for the lab.
You must download the JSON containing the Client Secret. If you close the window without downloading the secret, or if you lose the file. you will have to start over.
The screen should now say OAuth client created. Click on
Download JSONand make sure that you keep this file in a save location. You will need this file on your RPi in the next lab.This is your Client Secret – it is essential for being able to safely connect to the Google Sheets API.
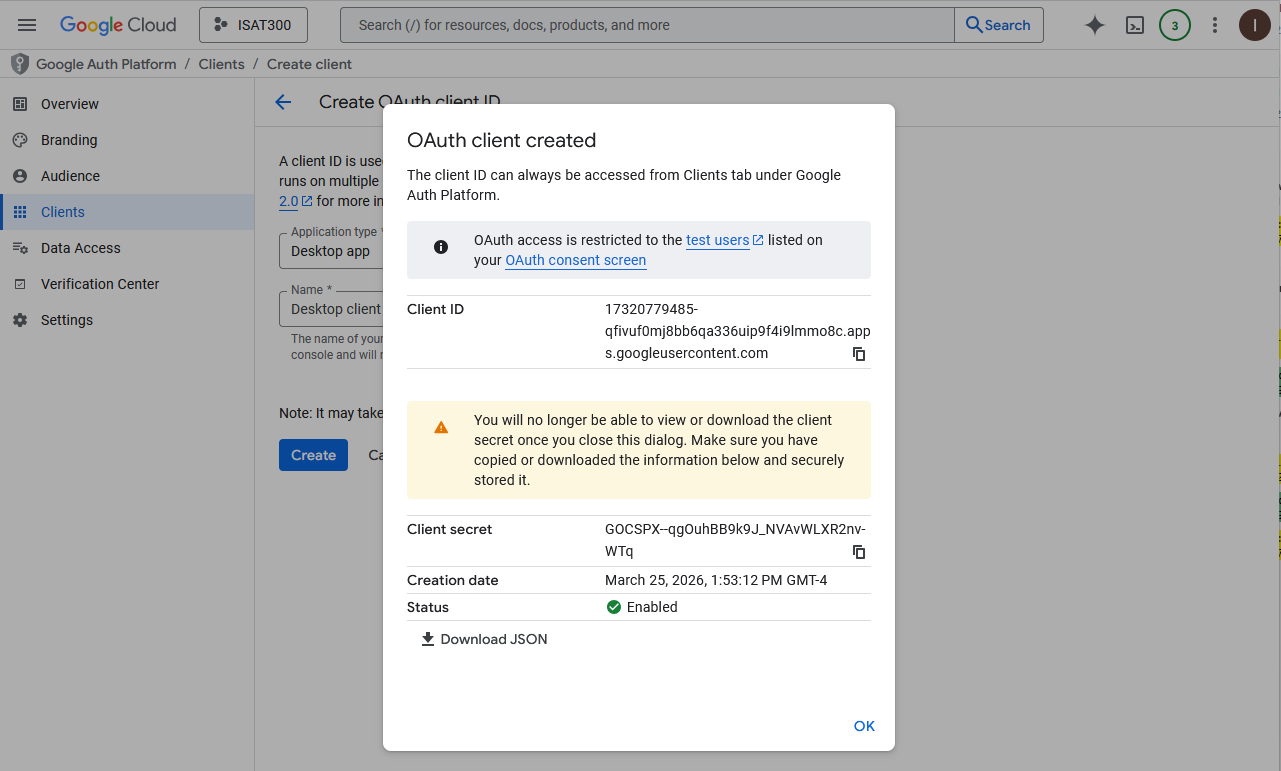
Credentials for Google Sheets API You should also copy the string that is displayed as the Client Secret to a textfile.
Rename the JSON file to
credentials.json. This file is the key for your RPi to access google sheets in the new account. You will need this file for the next labs.ImportantSimilar to the keys to your apartment the credentials file should not be shared with other people because it enables access to your google account.
Acknowledgements
These instructions were originally prepared by Dr. Chris Bachmann.
| Revision | Description | Author |
|---|---|---|
| 2025-03-25 (S26) | Updated to match current google cloud steps | Tobias Gerken |
| 2025-03-13 (S25) | Updates to match current google cloud layout and steps | Tobias Gerken |
| 2024-03-07 (S24) | Updated to Web, and updates to match current google cloud layout | Tobias Gerken |