Lab 5: Week 3 - Sending Cellphone Alerts
Purpose
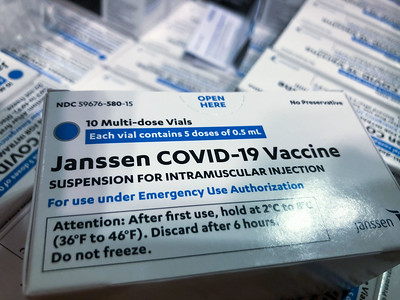
Imagine the not too far-fetched scenario: COVID-19 vaccines must be kept cold during transit and storage. To ensure this, continuous monitoring of temperature seems like a good idea. Having a system that sends an alert in case of unsuitable storage conditions would be even better.
In this fourth part of the thermocouple lab you will add to your Python script to send a notification to your cell phone if a specific temperature threshold has been crossed. You will also add to the Python code to activate an LED in flashing mode if the temperature is approaching the threshold value and to remain turned on (not flashing) if the threshold temperature has been exceeded.
Learning Goals
The goals of this portion of the Lab are to:
- Become familiar with Python programming used to control sensors and physical systems
- Activate the LED warning system when critical parameters are being reached or exceeded
- Notify the user’s cell phone when warnings are happening and action is needed
Background
COVID-19 spurred many technological advances. One of those advances, the mRNAbased vaccine, promises to revolutionize modern medicine and help humans rapidly respond to new and emerging infectious agents. The vaccines can be adapted rapidly to new pathogens are easy to mass produce. Distribution, however, was a major challenge – as the mRNA vaccines need to be kept cold as soon as they are produced, throughout the entire global distribution process, and right up until they are administered to a patient. Both UPS and FedEx had to make major accommodations to ensure the vaccine was kept cold while in transit – and this transition was not easy. Hundreds of thousands of doses of the new mRNA COVID vaccine were known to have spoiled due to excessive temperature exposure. Many more vaccine doses are likely to have failed due to excessive temperature exposure, but without continuous monitoring, went unnoticed.
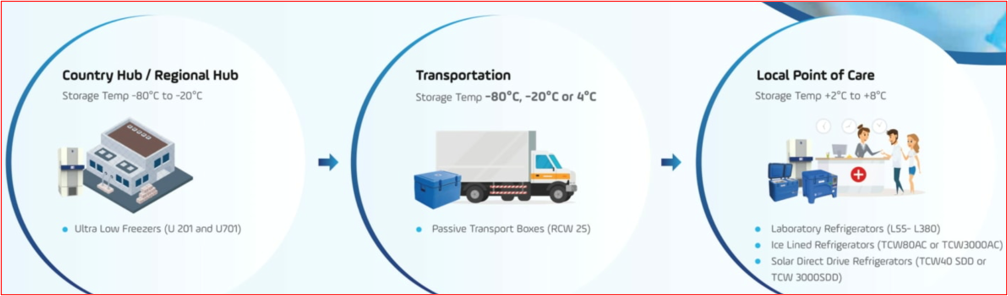
In this Lab, we will be simulating an mRNA vaccine shipment that must be kept below 8oC. We will use the thermocouple temperature setup we have been developing but will be adding a few key features. First, the temperature monitoring system will run continuously instead of creating a known number of samples. Second, the temperature monitoring system will activate a flashing LED alert staff BEFORE a critical temperature is reached. Third, the system will send an SMS message to the staff’s cell phone to alert them that action is needed. Fourth, the system will inform staff if the threshold both by cell phone and a steady LED light if the critical temperature has been exceeded and the vaccine has been compromised (and thus should not be used).
Methods
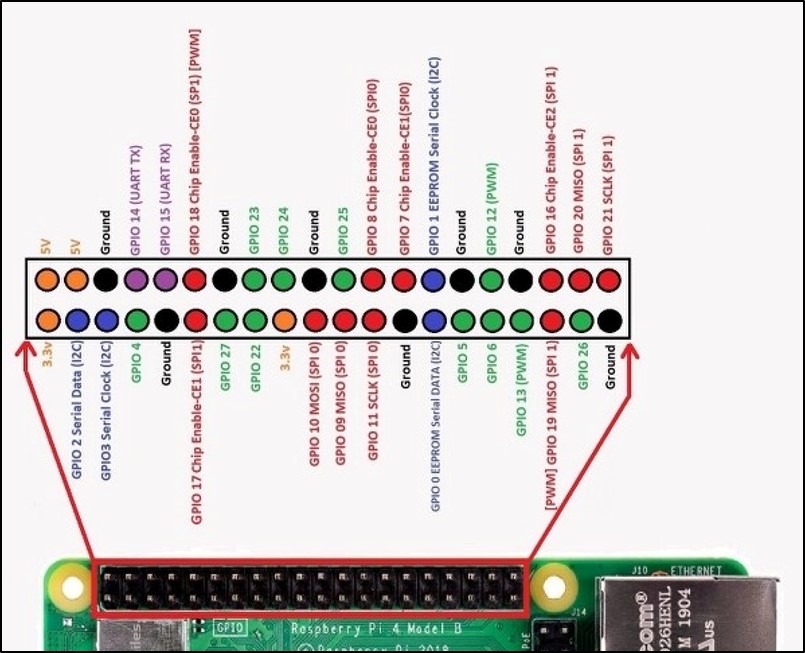
Methods - Step 1: Thermocouple Hardware Connections
Shut down the RPi before making the connection and ask an instructor to get the wiring checked before turning it back on!
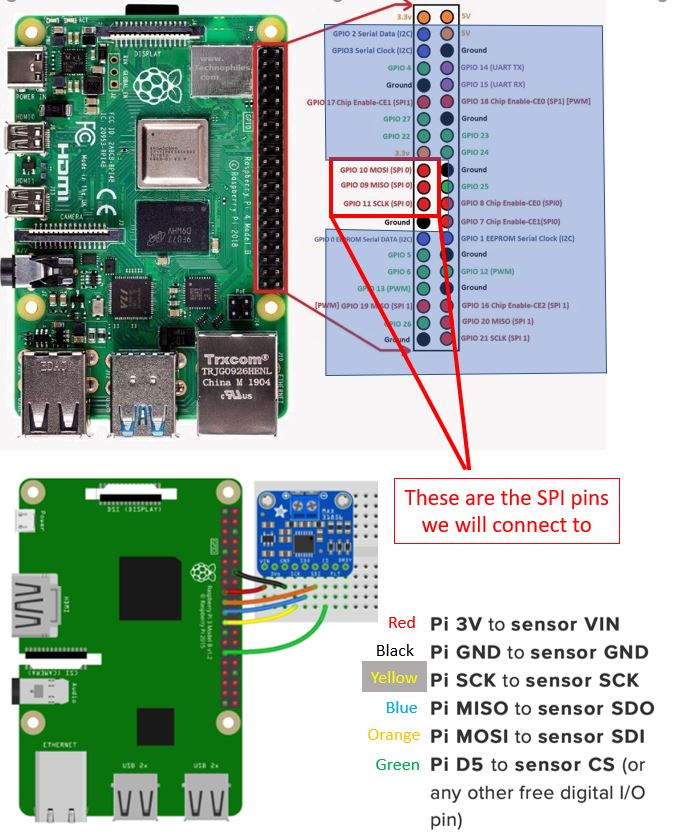
Connect the RPi to the MAX31856 as shown in the diagram below.
Methods - Step 2: Physical Connection for the LED
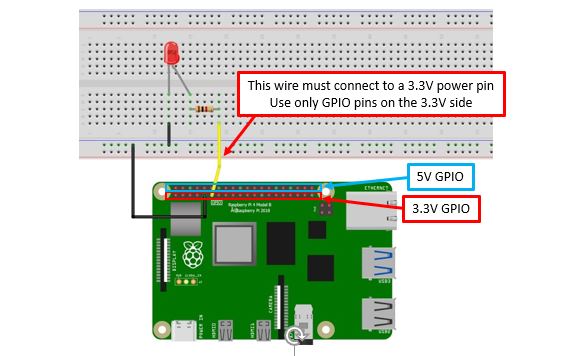
Connect the LED like in week 2. You might want to connect a second LED to activate if temperatures are too high (this is optional).
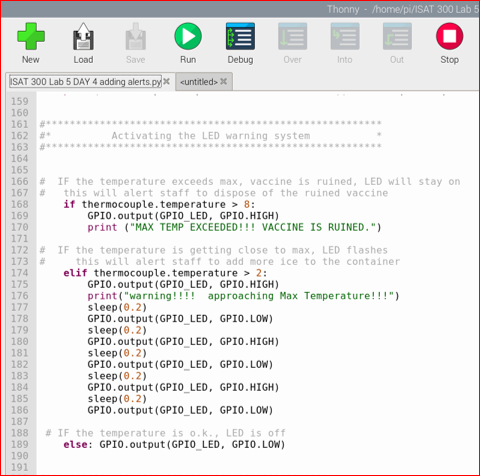
Methods - Step 3: Controlling the LED and Sending Alerts
For this lab, we will be sending two different alerts using the same LED. The LED should produce a flashing Warning signal BEFORE our critical temperature is reached, thus alerting staff to take action to cool the vaccine. IF the critical temperature is reached, the vaccine will be compromised and should be disposed of. IF the critical temperature is exceeded at any point in time, the LED should turn on and stay on.
There are many ways to accomplish this using Python. An example code is shown below. Notice that the MAX TEMP EXCEEDED alert comes first in the program - before the flashing alert indicating we are getting close to the maximum temperature.
It is necessary to put the MAX TEMP EXCEEDED warning first because anything above 8 degrees will satisfy both the flashing warning AND the max temp warning. If the loop is written with the flashing warning first, it will always cause the LED to flash for any temperature above that threshold and the IF loop will end. Therefore, we need to put the higher temperature condition first in the loop.
If you wanted to change the order, you would need to change the conditions of the if-elif-else statement.
Can you imagine how?
Add to your Python code to make the LED flash when the temperature is above 2oC and for the LED to remain on for temperatures above 8oC.
The code for the flashing LED (shown below) is available on GitHub: Lab 5 Day 3 ….
Merge your program with the provided code and use the ice water provided to test your system and ensure that it is working correctly.
Methods - Step 4: Installing the Pushover notifications App
The Raspberry Pi can connect to external devices through hardwire, WiFi, and Bluetooth - but it cannot connect directly to the SMS messaging system that is used by cell phones to transmit text messages via cell towers. To do this, we will be using a third-party Application called Pushover. We will then need to use their API to obtain security permissions to allow our Raspberry Pi to connect to their servers (just as we did with Google’s API last week). Once the proper security tokens have been obtained, we will add them to our Python script and insert the necessary code to enable the RPi to send messages to the cell phone via SMS text messaging.

The Pushover App is free to install on Android phones (free for 30 days – then $4.99 for unlimited use after that).
Before the lab: Please have one team member install the app on their cell phone!
Record the Username and Password; these will be needed for the API.
Methods - Step 5: Activating the Pushover API
The next steps must be done on the Raspberry Pi, so we can download the necessary security keys.
Go to: https://pushover.net
Login using your Pushover username (email) and password. Leave this window open so you can access the user/group key (you will need to copy this into the python script)

Retrieving your API Key Open the
APItab in a new window. Click on Register your application in step 1.Enter a name for your Application (e.g. the Lab Name)
(Optional) Open the browser to find a square image you would like to use for the notifications. Save the image to the RPi. If the image is not already a PNG, simply open it and use Save As to make it a PNG. I will be using Duke Dog.
Click Create Application
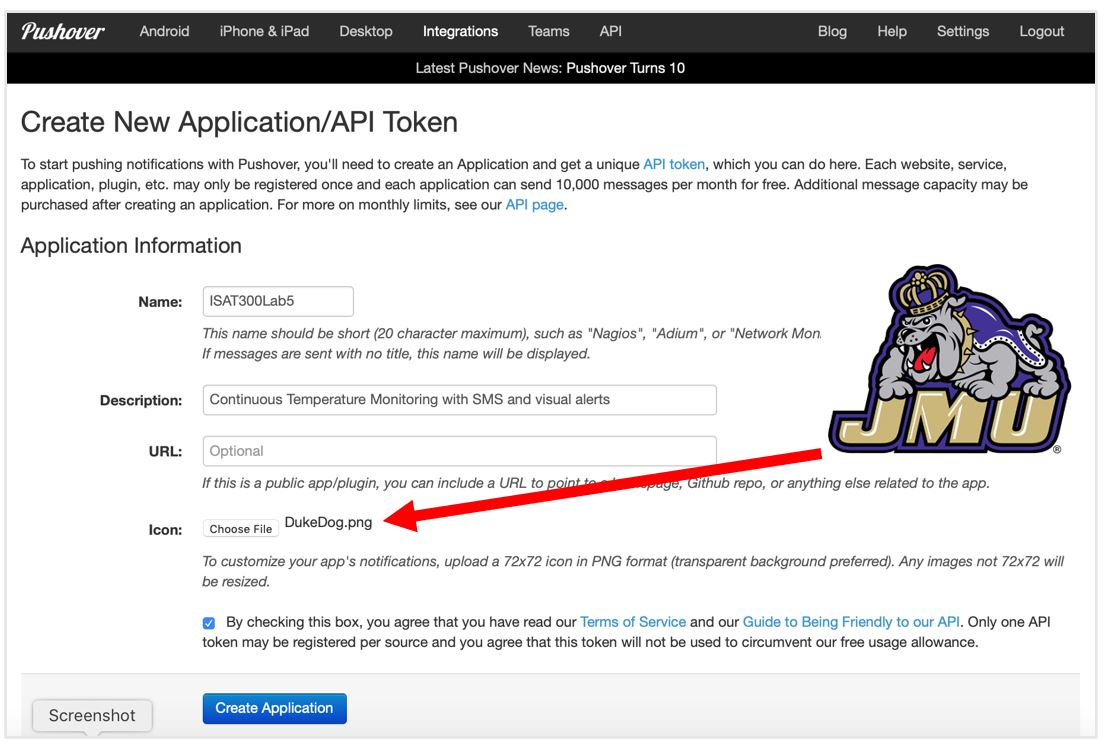
If everything is working correctly, you should see this screen displaying your API Token/ Key.

Test your system using the Python code shown below. It is available on GitHub: pushover.py
ImportantNote that you will need to enter YOUR User Token/key and YOUR App Token/key
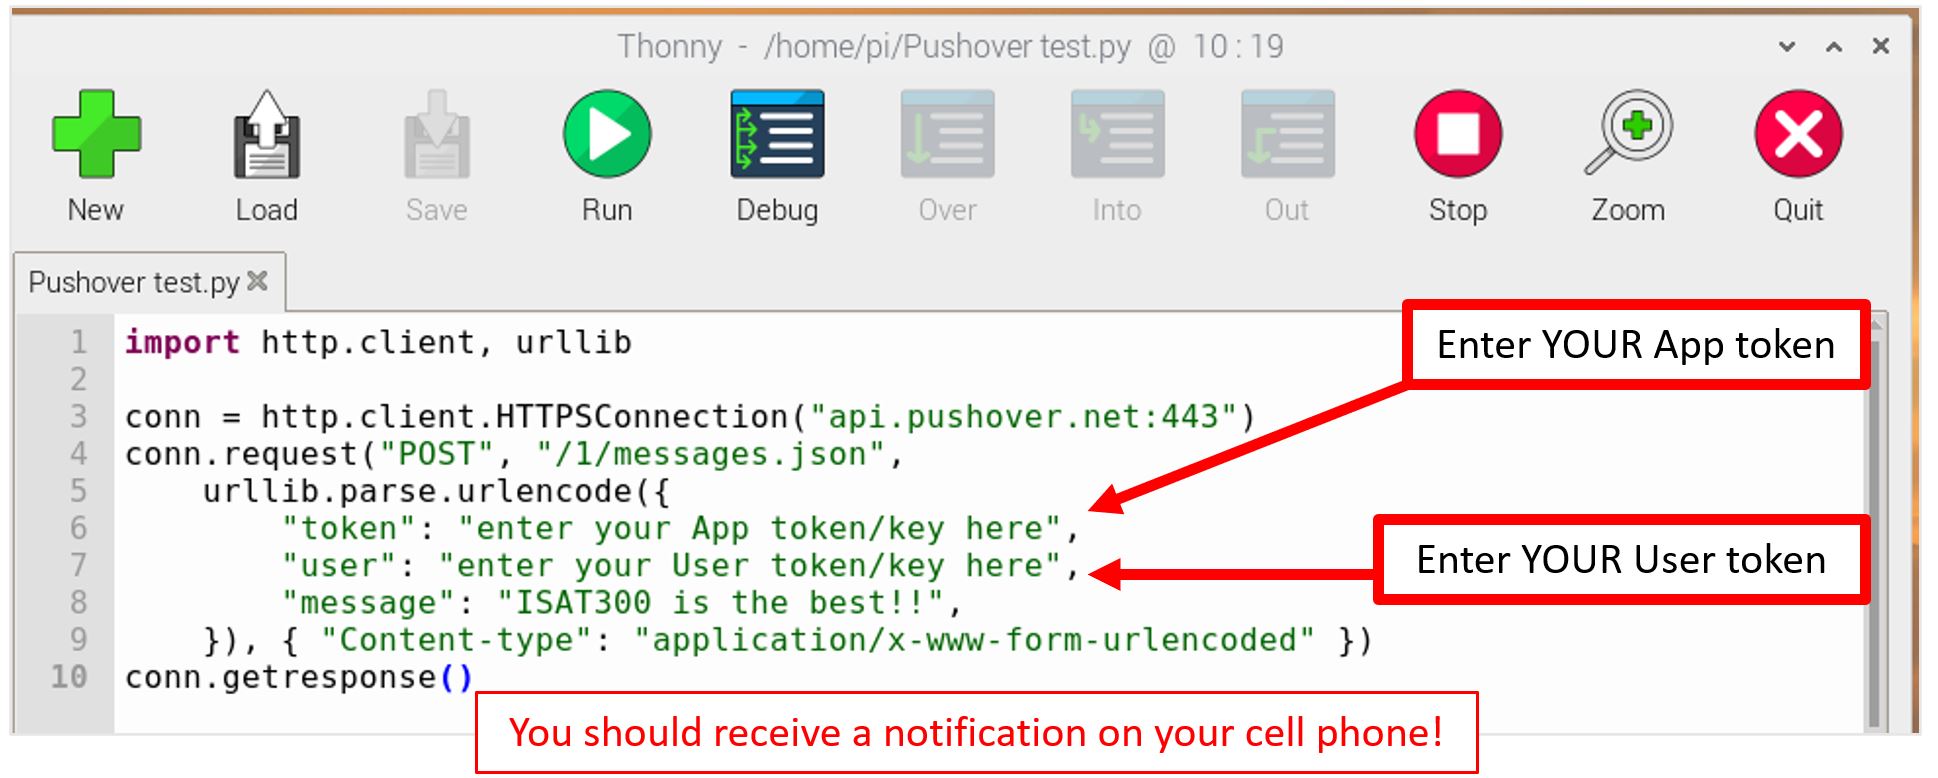
Testing the Pushover App
Methods - Step 6: Finalizing the Python Code
Google requires you to re-authenticate every week. This means the token.json expires and your program will produce an error.
To avoid this, you need to delete the token.json file from your Lab 5 folder. If you then run the program again. The code will check for the credentials.json file and ask you to re-authenticate. Follow the screen prompts to then log back into your ISAT 300 google account.
Add the Pushover Python script to your Python code in the appropriate location.
You can embed this in the existing LED control loop (twice – once for Max Temp Exceeded, once for Approaching Max Temp.) OR you can create a new loop. In either case, it must come within the main control loop that will run until the temperature exceeds a certain threshold (I recommend 9 oC for the main control loop).
OptionalYou can have Pushover send email notifications as well as sounds and images.
Visit Pushover.net for more details if you would like to add these to your Python code.
Add error handling to ensure that the system keeps running.
Since we are planning to run the alert system over a longer time, we need to ensure that small, temporary network connection issues or other instabilities in the connection don’t cause our program to crash and abort.
To do so, we implement two strategies:
First, we increase the time that the API will try to establish the connection. We can do this by increasing the threshold before the API stops trying to establish a connection.
Add the following two lines near the top of your python program to do this.
import socket
socket.setdefaulttimeout(10) # Sets the default timeout to 10 seconds
Secondly, we should also implement some error handling. In general error handling is something that we should always do, since we don’t want our programs to fail completely if something goes wrong (or at least we want to know what happened to our program).
Python has a built in method to handle errors - called exceptions -, which is the
try-exceptmethod.A
try-exceptblock works very similar to anif-elsestatement. It will try to do the first thing, and if that does not work it will execute the alternative statement. In our case, we want to wrap our API-calls into a try-except block.
Modify the code inside the measurement loop, where the API is called, like this1:try: result = ... #keep the code as is here result = ... #keep the code as is here except socket.timeout as err: print("Connection timed out.")Now, the program will try to connect and write to the google sheet. If that fails, rather than crashing, it will execute the print statement to print the error message and then continue with the loop.
Test your system to be sure it is working.
ImportantYour system will run over the weekend!
Your goal is to be alerted when approaching the threshold temperature and when the threshold has been crossed.
You can monitor the situation at any time, from any location, using your Google Sheets.
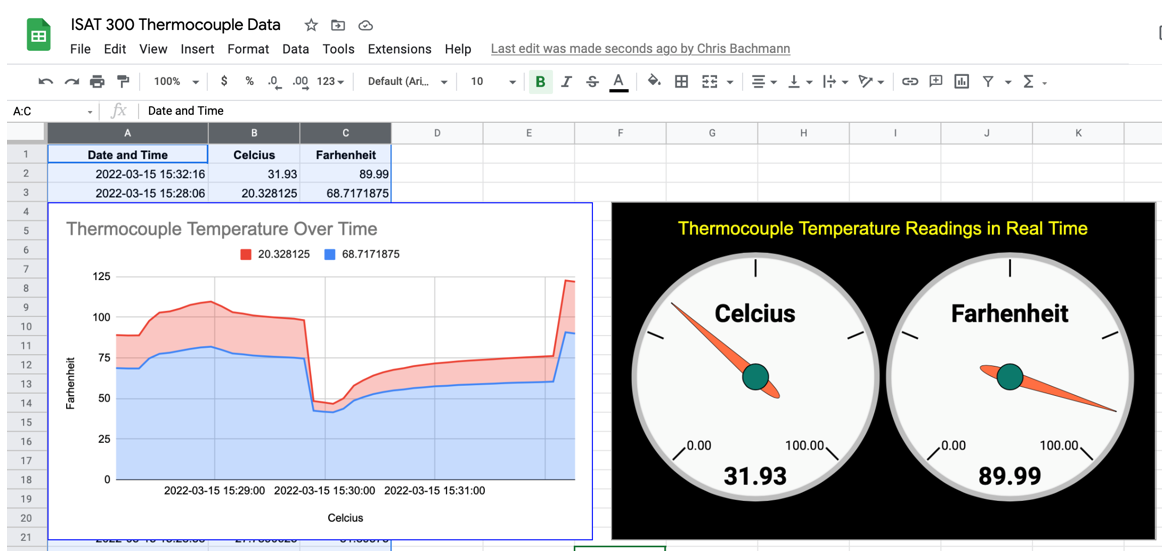
Monitoring temperature with the dashboard
Acknowledgements
This Lab was designed by Dr. Chris Bachmann with modifications by Tobias Gerken. Special thanks to Joe Rudmin for helping secure necessary equipment and for providing lab support.
| Revision | Description | Author |
|---|---|---|
| 2025-04-03 (S25) | Error handling for google sheets API was added | Tobias Gerken |
| 2025-03-19 (S25) | Moved deliverables to main page for lab | Tobias Gerken |
| 2024-03-27 (S24) | Updated to Web and updates for clarity | Tobias Gerken |
| Initial Version | Chris Bachmann |
Footnotes
Don’t change the code the lines that contain the actual API-call and that begin with
result =↩︎